Young percussionists typically begin mallet study with lessons on either the marimba or xylophone because both instruments require similar technical skills. Later, when a vibraphone part appears in a band piece, these students apply their marimba skills to the new instrument, only to find themselves headed for trouble.
Left to their own devices, they are unsure of what to do with the sustain pedal and most don’t know how to control the instrument’s ring. If they try the vibraphone part, the result is usually a thin sound that has an over-abundance of sustain, creating a wash of sound. The vibraphone has special qualities that easily become clear during lessons, especially if the instructor reviews the basic attributes of the marimba – its size, playing grips, the body stance of the performer – and compares them to the vibraphone.
Materials and Sizes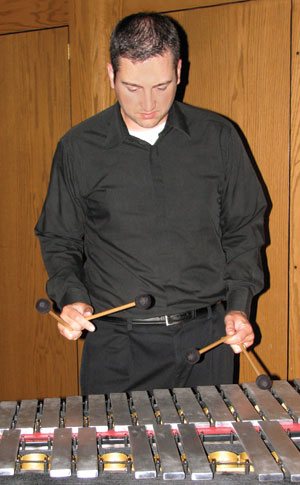
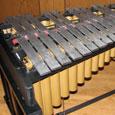
Marimbas are currently made in several standard sizes, between four and one-third octaves, A2 to C7, to five octaves, C2 to C7. The vibraphone is a smaller instrument with a range of three octaves, F3 to F6. The bars of a marimba can be made of rosewood, padouk wood, or synthetic materials. Because of the nature of these materials and the way the bars are tuned (emphasizing the two-octave partial), marimba bars ring longer than those of a xylophone, but both decay quickly compared to vibraphone bars.
Vibraphone bars are constructed of metal (steel or aluminum), and when struck they have more give than the brittle bars of a marimba. The naturally long sustaining quality of vibraphone bars means a percussionist is less likely to use a roll to prolong the sound. To help percussionists control the sustain of the bars, vibraphones come equipped with a sustain pedal. When the pedal is pressed down, the bars ring freely; and when it is in the up position, the pedal mutes the bars.
The accidental bars on the marimba are positioned higher than the natural bars, and they also overlap the natural bars. Because of this, a percussionist on marimba can execute passages rapidly, moving quickly between the natural and accidental bars by hitting in the center of the natural bars and the edge of the accidentals.
The accidental bars and natural bars of the vibraphone are on the same horizontal plane, allowing the damper bar to touch both rows of bars at the same time. This characteristic has an important effect on the technique used to play the instrument.
Vibraphones are also equipped with an electric motor that produces a vibrato sound by turning a butterfly mechanism in the upper aperture of the resonators. Some composers request this vibrato in certain passages of their music.
Grips and Strokes
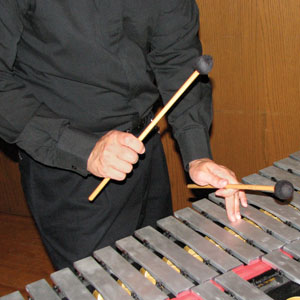
The grip used for playing each of these instruments is basically the same. Both the marimba and the vibraphone are typically played with one or two mallets in each hand. When one mallet is in each hand, most percussionists hold them as they would hold drumsticks when playing with a matched grip on snare drum.
Several standard four-mallet grips for marimba can also work well on the vibraphone. The Burton grip, with the sticks crossed in the hands, is probably the most common four-mallet grip used on the vibraphone.
One important difference between playing the marimba and the vibraphone is the stroke. A typical approach to a stroke on the marimba is to play a piston stroke, or down-up stroke. This is a wrist-based stroke that uses only a little arm movement. The default position for the piston stroke is the up position with the wrists bending back.
Although the stroke used on vibraphone is similar to that for marimba, the metal bars of a vibraphone have more give than those of a marimba; as a result they require more weight during the stroke to produce a full sound. To achieve this weight, players add a little forearm motion to the wrist motion in the down stroke, giving more weight to the attack and producing a rounder sound. After the attack, the player uses a less-snappy up-stroke.
The vibraphone stroke sometimes requires less rebound than the piston stroke, allowing for bar dampening techniques. Another element that adds weight to the attack is the dense core of vibraphone mallets combined with an outside wrapping of heavy chord instead of the yarn used for marimba mallets. The weighted core of the mallet helps the sound of the vibraphone bar to blossom quickly.
The optimal place to strike both a marimba and a vibraphone bar is in the center; the second-best place is exactly on the edge of the bar. For fast runs on the marimba, a percussionist hits the naturals in the center and the sharps or flats on the edge of the bar. However, unless the tempo of a passage requires the marimbist to play the accidentals on the edge, he should play in the center of both the natural bars and the accidental bars.
Because the distance from the center of the natural bars to the center of the accidental bars is greater on the vibraphone than on the marimba (the bars do not overlap), fast passages can be difficult to play. Because of this, many vibraphone players use double-sticking patterns (RR, LL) on scales. For example, a vibraphonist playing an E major scale might stick with his left-hand mallet playing the naturals as his right-hand mallet plays the sharp bars.
A vibraphonist can also play on the edge of the bars; however, this can be more difficult than on marimba because the vibraphone bars do not overlap. One advantage of the flat-barred vibraphone is being able to play on the edge of the natural bars, which can be especially handy for playing block chords with four mallets on the vibraphone.
Body Stance Another difference in playing technique between the marimba and vibraphone is the stance of the player. For marimba, the performer should center his body in the middle of the range of notes he will be playing for a particular piece.
The player should stand at a comfortable distance from the instrument, not so close that his elbows protrude behind his back or far away that he has to reach for the center of the bars. During a passage that extends from the low range to the upper range of the marimba, the player takes a step to the right or the left, keeping his torso in front of the notes he is playing. Students should be careful doing this because they tend to take unnecessary steps.
Although a marimbist is free to step in front of any range of the marimba, a vibraphonist’s movement is limited because he has to keep his right foot on the sustain pedal while the left foot bears most of his body weight. He can step to the left with the left foot to get the torso in front of the low range of the instrument, and he can also cross the left foot behind the right foot, which moves the torso in front of the notes of the upper range of the vibraphone. With this last movement, good balance easily becomes a problem.
Dampening Techniques
One important difference between a marimba and a vibraphone is the amount of ring that sounds from the bars after the attack. This difference is the impetus behind a handful of techniques that percussionists use solely on the vibraphone. While the marimba has a fairly resonant sound, percussionists have to play a single-stroke roll on the bars to prolong the sustain of the sound. Because of the long sustaining sound of vibraphone bars, rolls are seldom played on the vibraphone; however, there are instances when rolls are notated or are merited on the vibraphone.
 Occasionally, the ring of marimba bars may last too long for a musical passage. For those instances, touching the center of the bar, or touching or grabbing the edge, will dampen the sound after the attack. Although dampening marimba bars is fairly rare, dampening vibraphone bars is common and a natural requirement of playing the instrument well.
Using the sustain pedal is a great way to cut off sound on the vibraphone, and it requires only minimal coordination between the hands and the right foot. However, there are additional techniques to learn because this is an all-or-nothing kind of sound control. In addition to basic pedaling, other bar dampening techniques include half pedaling, hand dampening, mallet dampening, simultaneous dampening, and slide dampening.
Half pedaling reduces the ring of the bars without completely cut off the sound. The performer pushes the pedal down most of the way so the damper bar still touches the bars, but just barely. This reduces most of the sound bleeding from note to note without making the vibraphone sound too thin or clunky like it might if the pedal was left up.
With half pedaling, the notes ring a little but not at full volume. Because the notes are slightly muffled when struck, the quality of sound tends to suffer. Half pedaling can be applied to fast runs when the player does not want the pedaling to be obvious.
Hand dampening is the easiest way to cut off the sound of one note while keeping the pedal down so that the other played notes continue to ring. To do this simply touch the note to be dampened with the back fingers of either hand. Touch the bar in the center or, to cut the sound off quickly, touch the edge of the bar. This is especially useful for taking out the sound of a nonchord tone while letting a chord ring. It is the same technique used to dampen marimba bars.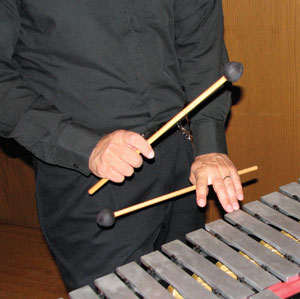
Mallet dampening, like hand dampening, cuts off the sound of a note while allowing other notes to ring. It is a little more difficult to master than hand dampening, but it is much more efficient. With mallet dampening, the player presses the bar to be dampened either in its center or on the edge with a mallet head, being careful not to make an attack when pushing into the bar. Most vibraphonists use mallets with flexible rattan handles because of this technique. The rattan softens the sound of the mallet coming into contact with the bar when dampening.
For simultaneous dampening, the vibraphonist plays a note with one mallet while dampening a different bar with another mallet. The difficulty of simultaneous dampening is making sure the mallet heads make contact with the bars at the same time. Another challenge is making sure the mallet that does the dampening does not touch that bar audibly. This tends to happen when players begin learning this technique, especially when students lack the independence of motion between the hands. Once the coordination is worked out, simultaneous dampening is a truly valuable technique.
Slide dampening is an advanced technique that requires a mallet to strike a note and then slide over and dampen another note – all in one motion. It has to be a quick hand motion. Of course, the note that is cut off should be close to the bar being struck. This type of attack occurs in one rapid motion and usually involves a brief moment of sound bleeding.
Notation Differences
Musical notation is also different between the marimba and the vibraphone. Marimba music can be notated on a single staff or on a grand staff, depending on the piece. Vibraphone music is often notated on a treble clef staff because of its three-octave range. There is no real standard approach to notating the sustain of the vibraphone. Some composers use pedal markings, similar to a piano part, but others do not notate the pedaling at all. Even when pedaling is included, players are free to add pedaling as they see fit.
The vibraphone is by nature a ringing instrument, which means that its sustain has to be controlled. If it is not dampened enough, all the notes will bleed together into a wash of sound. If the pedal is left entirely up, the notes will never reach their maximum volume and the timbre of sound will be thin.
A vibraphonist should attempt to have as clean of a sound as possible. Even in the most detailed vibraphone notation, there is room for individual choices for cutting off sound. The standard way to notate mallet dampening is with an X on the line or space following the note head of the note that is to be cut off. Sometimes this notation will be below or above the staff because it can be difficult to fit on the staff, but this causes another problem in that it is difficult to know exactly which note needs to be dampened and when. To add clarity a vibraphonist can dampen notes that are not a part of the chord or that are a half step or whole step away from the final note of a run.
Once young percussionists have a solid foundation in marimba technique, directors should automatically expand their knowledge, comparing these skills to vibraphone technique and the differences in the stroke, body stance, pedaling, and dampening the instrument. With this knowledge and a little practice, young mallet percussionists can confidently play with a full, correct sound on the vibraphone. Their effort will contribute to a much more professional and representative sound from the entire ensemble.
Vibraphone Methods
Vibraphone Technique: Dampening and Pedaling by David Friedman (Berklee Press). This book is the quintessential method for teaching vibraphone technique. It addresses pedaling and mallet dampening, offering excellent etudes that focus on developing both skills. I highly recommended it for students who have some experience on xylophone and marimba but wish to seriously study vibraphone technique.
A Musical Approach to Four-Mallet Technique for Vibraphone, Volume One by David Samuels (Excelsior Music). This author outlines technical practices, such as holding four mallets, sticking, pedaling, and dampening. It is an excellent method for students who have some mallet experience and want to delve more deeply into vibraphone study.
The Vibes Real Book, by Arthur Lipner (MalletWorks Music), is divided into four sections: Method, Theory, Improvisation, and Repertoire. The first section introduces vibraphone technique and includes exercises and examples of pedaling and dampening. The following three sections help students to understand jazz and develop jazz vibraphone skills.
The Art and Language of Jazz Vibes by Jon Metzger (EPM Publications). Another method geared toward playing jazz on the vibraphone, this edition has many good ideas for developing technique on the instrument. It also offers excellent suggestions and exercises for playing jazz vibraphone with two mallets or four mallets.
Vibraphone Technique: Four-Mallet Chord Voicing, by Ron Delp (Berklee Press), is a wonderful method for students who are already comfortable playing the vibraphone but want to work on jazz comping and soloing. Although it does not discuss pedaling and dampening, the edition gives clear and logical suggestions and exercises to develop jazz vibraphone playing.
Four Mallet Studies by Gary Burton (Creative Music). Vibraphonist Gary Burton begins this method with technical suggestions, followed by a variety of technical exercises to develop comping and chord-voicing skills.