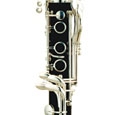
.jpg) When clarinet students suffer from poor tone quality, the cause is usually improper care and placement of the reed or haphazard tuning of the instrument. Here are some ways for band directors to check for these problems.
When clarinet students suffer from poor tone quality, the cause is usually improper care and placement of the reed or haphazard tuning of the instrument. Here are some ways for band directors to check for these problems.
Have students soak their clarinet reeds in water instead of simply moistening them in the mouth. When saliva touches the reed, there is a chemical reaction within the cane that creates a protective coating on the outside of the reed, preventing saliva from reaching the interior. Only water can penetrate this barrier and completely moisten both the interior and exterior of the reed.
Clarinetists should have a small water container. I prefer the 30-milliliter plastic travel bottles, which are leak-proof when tightened securely and small enough to store in the bell of the clarinet. Place the reed tip-down in water before putting the clarinet together. Either soak the shaped portion of the reed from the tip to the bark (my preference), or immerse the entire reed. In the time it takes to assemble the instrument, the reed will be soaked thoroughly. Stick the reed in the mouth to get rid of the excess moisture before placing it on the mouthpiece. Soaking times vary, and old reeds should soak longer than new ones.
A common mistake students make is placing the reed too low on the mouthpiece. This produces a pinched sound. Many teachers tell students to leave a sliver of mouthpiece above the tip of the reed when lining up the reed on the mouthpiece, but students often exaggerate the size of the sliver and place the reed too low on the mouthpiece. This leaves the opening above the reed too large.
The tip of the reed should be slightly above the mouthpiece. With the reed facing away, hold the mouthpiece at eye level and move the reed until it just extends beyond the mouthpiece. Having the reed in this position has no effect on playability; if more reed extends beyond the mouthpiece, the reed will feel slightly harder. There is no affect the sound until it is 1/8"-1/4" beyond the mouthpiece. If you notice students sounding stuffy and overexerting themselves to produce a sound, the reed may be too high on the mouthpiece.
Many students use reeds that are too soft, which can cause flatness, a honky sound, and an inconsistent upper register. To figure out whether a student should have a harder reed strength, put more than just a sliver of reed above the tip of the mouthpiece. If the sound gets worse, the reed strength is correct. If the sound gets better, keep pushing the reed higher until the sound becomes stuffy and difficult to produce. If the reed is raised an eighth to a quarter of an inch above the mouthpiece when this happens, the student should move up a half strength.
In an emergency, a student may need to play on an old, soft reed. To improve the sound of such a reed, move the tip slightly higher than a sliver above the tip of the mouthpiece. This will give the reed a little more strength to blow against.
Warped reeds, a common problem, often cause squeaks, a thin, bright sound, or are simply difficult to play with. To find warps in a reed, set it flat side down on a clean, flat surface. Put pressure on each side of the reed, right above the bark, with a finger and notice whether either side of the reed rocks upward. If either side of the reed moves when pressure is applied to the opposite side, the reed is warped.
Unless students have problems when playing, it is unnecessary to do anything if the reed moves only slightly during the test. If the reed moves quite a bit, sand the back part of the reed. Start by placing a piece of 320-grit wet/dry sandpaper on a flat surface. Place a moistened reed on the sandpaper, being careful to keep the tip of the reed off of the sandpaper. Place one finger on the reed right above the bark, one in the middle of the bark, and one at the bottom. Slowly move the reed back and forth lengthwise on the sandpaper, applying only minimal pressure.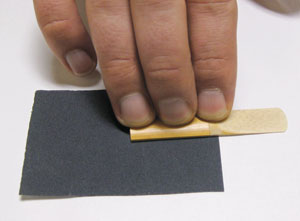
After six to eight sanding motions, soak the reed in water for thirty seconds and try playing on it. If there is no improvement, sand for six to eight more motions. This process can be repeated several times, but be aware that sanding eventually results in a much softer reed. Sanding a reed may not completely remove the warp; it will only make the reed lie slightly flatter against the mouthpiece. If a few rounds of sanding do not help, discard the reed.
Students rarely put enough of the mouthpiece into their mouths. Although this problem is rarely noticeable in the low register, it will become apparent when students start using the register key. Students with too little mouthpiece have a difficult time playing high notes, and the notes that do come out have a grunting sound. To fix this, allow more of the reed to vibrate by opening the jaw and putting more of the mouthpiece into the mouth.
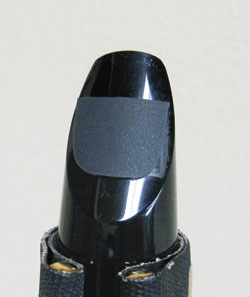
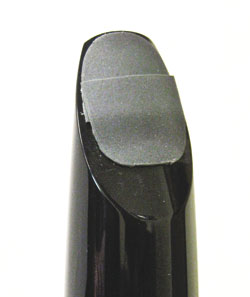
Most students quickly forget to do this after being told, but a mouthpiece cushion can make a good reminder. Cut a long mouthpiece cushion in half. Place the flat edge of one of the halves about three-eighths to one-half of an inch down from the tip of the mouthpiece. Students should place their top teeth up against this edge, but not on top of it, while playing. If the sound squeaks or is difficult to control, move the cushion towards the tip of the mouthpiece until they can control the amount of reed that vibrates. The other half of the cushion should go in a spot that will make the teeth more comfortable. The two halves will overlap slightly.
For consistent intonation, a clarinet should be adjusted in three places: at the barrel, between the upper and lower joint, and the bell. It is a common mistake to assume that pulling out at the barrel will fix sharpness throughout the instrument. Pulling out at the barrel only affects the notes fingered in the top portion of the upper joint.
To tune thoroughly, clarinetists should use three different notes. Start by tuning the top of the instrument with open G, pushing the barrel in or out to adjust the pitch. The bottom of the barrel should never be up to the cork. If this happens, there is a problem with the embouchure or equipment. Students should not use resonance fingerings when tuning open G. These fingerings work to bring the pitch down on individual notes but will interfere with tuning the instrument as a whole.
There are two options for tuning the middle portion of the instrument. Intermediate and advanced students should use G, and beginners should play C4, which has the same fingering as G5 but without the register key. Pull out between the upper and lower joints of the instrument if the pitch is sharp. As most instruments are sharp in this range, most students will end up pulling out. Make sure students know that the instrument will fall apart if the joint is pulled too far, and that the bridge keys should remain aligned.
Students who can play over the break should also tune the bottom portion of the instrument. Young students typically play flat in the low register so their bells should be all the way in. Play C5, and pull out at the bell if the sound is sharp.