
The job of learning to use a camcorder to record a recital or lesson is the first part of making a video. The next step is editing the video so you can produce attractive, professional-looking recordings to upload to a web page or burn to DVDs for the parents and families of your students or to sell as a fundraiser.
Basic video editing techniques include importing the recorded material to a computer, trimming unwanted sections, rearranging clips (portions of video), and adding transitions and titles to the presentation. With the help of inexpensive and easy-to-use computer programs, you can easily learn to edit and produce movies in no time.
The examples and explanations in this article were created with the Macintosh program iMovie 08, part of the iLife package produced by Apple. The new version of iMovie 09 features very similar menus and functions. Windows programs such as Ulead and Pinnacle include functions and tools similar to iMovie, but they have a different look and organization. Fortunately, the programs for both Macintosh and Windows computers come with detailed, helpful menus and step-by-step guidelines for each process.
Capturing Video Material
Into A Computer
After recording the video, you have to move it from the camcorder into your computer, a process called importing or capturing video. Capturing video into a computer is similar to dubbing videotape into a VCR. It is a four-step process: connect the camcorder to a computer; prepare the computer to capture the video; hit the play button in the camera; and wait for the material to pass through the cable into the computer. All of the different capturing programs show you the material as it is being captured to the computer. The capturing process takes as long as the length of the video material you want to capture. For example, if the movie is 15 minutes long, it will take 15 minutes for the video to go from the camera into your computer.
Importing video from miniDV or DVD cameras with iMovie involves the following steps.
1. Connect the camcorder to the computer with a FireWire or USB cable. A FireWire cable is the preferred way to import video into computers because it produces the best results. If the camcorder has a FireWire port and the computer does not, you may want to consider buying a $20 FireWire PCI card for the PC. Mac computers generally include a FireWire connector.
In some cases you may also have to buy a FireWire cable to connect the camcorder to the computer if the cable did not come with the camera. If you buy one, be sure to bring the camcorder to the shop and show it to the store clerk so that you get the right connector size.
2. Open iMovie in your computer.
3. Go to File>Import from Camera. A new Import window will open.
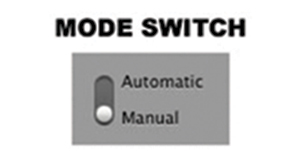
4. Find the spot at which you want to start to import video. Switch to Manual mode on the screen. This will show the camera control buttons on the screen, i.e. Play, Stop, Rewind, and Fast Forward. You can then control the camera with those buttons.

If you click the Play button in iMovie, the camera will start playing the inserted videotape and the computer will show the images on the screen monitor of the iMovie window. Rewind or fast forward the recording until you find the beginning of the video.
5. Click Import. Once you find the beginning of the material you want to capture, press the Import button that appears on the screen monitor and choose an appropriate name for the event, such as the name of the student, that you will import.
You will see the captured material as it is being imported. A new event will appear in the Event Library after you click the Stop button.
Working With Clips
Set aside some quiet time to begin the process of capturing the material into your computer. It is useful to create separate events of each work or piece in the recorded material. Later you can rearrange the order of the music, trim unwanted material from each clip, and insert titles and transitions.
iMovie lets you create separate events by clicking the Import and Stop buttons on the iMovie Import screen at the beginning of each clip. You can also capture an entire recording as one large event and later split it into smaller clips. The Help section of the program will guide you through the process.
In the examples to the right, two events of a student piano recital appear in the Event Library in the lower half of the computer screen. If you drag your mouse over the clips in any of these two events, you will see and hear a playback of that clip in the iMovie monitor screen.
Trimming Clips
The process of getting rid of unwanted portions of material is an important step in editing. In the example of the piano recital, the teacher may want to get rid of false starts, the applause of the audience, or the time it takes a student to start a piece after he sits down on the piano bench.
There are a few different ways to get rid of unwanted material in the original clips. The easiest way is to select the portion you want in the Event Library by clicking the beginning of the desired portion and dragging the mouse to the end of the desired portion. The selected region is highlighted in yellow in the example on the the previous page. You can then move that portion to the Project area to start building your movie.
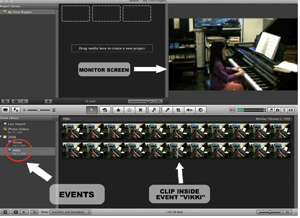
The Event Library (bottom half of screen) has two events. Event “Vikki” is currently selected. You can watch Vikki Chen’s performance in the monitor screen by dragging the mouse over the clip in event “Vikki.”
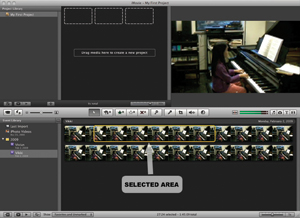
A protion of the clip has been selected (it is highlighted in the yellow frame) and is ready to be moved to the Project area in the top half of the screen.
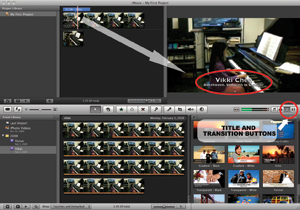
The name of the performer and the piece have been added over the clip in the Project area.
Building A Movie
Once you capture and trim the clips, you can start building the movie. This is an easy process with iMovie. Simply drag the clips from the Events Library and drop them into the Project Library area in the order you want them to appear in your movie.
To watch the new movie in portions or in its entirety as you build it, simply move the mouse over it and click the Space bar.
Adding Titles and Transitions
Editing programs let you add titles and transitions between clips. In the example of the student recital, a teacher could add titles to identify the name of each performer and the piece he played. Transitions help to avoid any sudden shifts between one clip and the next. Typical transitions used for movies are the cross-dissolve, the fade in, and the fade out.
iMovie includes many types of still and animated titles in different fonts and colors, and several fun transitions add variety and excitement to movies. These tools and others are available by clicking the Titles and Transitions buttons located under the monitor screen in the iMovie window.
Titles can be added at any point inside the clip and later easily edited in length or appearance. You can also control the timing, size, color, and other parameters of the titles. The Help window of iMovie offers detailed information about how to use these features. As with trimming, everything you add to a movie can be changed or returned to its original, unedited state.
Saving The Movie
iMovie automatically saves all your clips and events. The saved files are viewable only in iMovie; additional steps will need to be taken to format the movie for the web.