When young players lack the size and the hand and arm strength to control a string bass, they often compensate for their physical limitations and develop bad habits. With this large instrument the fundamentals established at the first lessons are particularly important.
Posture and Instrument Position
Beginning bass students should be comfortable holding the instrument in a good position before playing a note. The end pin should be adjusted so the ridge at the top of the fingerboard (called the nut or saddle) is level or just above the player’s eyebrow. If a student has to bend over drastically to place the bow on the strings between the bridge and fingerboard, the end pin should be lengthened.
The bass should lean in toward the player, and the player should lean into the bass. Many students will stand erect and hold the bass straight up, leaving a space between body and instrument, but this posture causes all types of bowing problems. The instrument should be held against the body. The feet should form a 45° angle with the left foot positioned just behind the end pin and all the body weight on the right foot; the instrument and player should never be locked into a stationary position. The joints of the body should move fluidly, like the hinges of a door, when playing the bass.
Right Hand Position
The position of the right hand depends on whether a German or French bow is used.
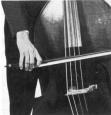
.jpg) A German bow has a larger frog to accommodate the hand and fingers in a palm-inward position. The German bow rests in the hand between the thumb and index finger, with the thumb curved over the top of the stick, pointing toward the index and middle fingers. The ring finger hooks through the opening of the frog while the little finger sits under the frog next to the hair. Players should be able to take away the three middle fingers and hold the bow with the thumb and the pinkie, which maneuver the bow.
A German bow has a larger frog to accommodate the hand and fingers in a palm-inward position. The German bow rests in the hand between the thumb and index finger, with the thumb curved over the top of the stick, pointing toward the index and middle fingers. The ring finger hooks through the opening of the frog while the little finger sits under the frog next to the hair. Players should be able to take away the three middle fingers and hold the bow with the thumb and the pinkie, which maneuver the bow.
The thumb applies the pressure on the bow as it contacts the strings, and the pinkie gives the lift as the bow comes off the strings. The hand should cradle the bow, not grip it tightly. The other fingers simply add control, but students often grab the bow with these fingers and apply too much bow pressure to the strings.
The French bow is held like a cello bow with the thumb on the side and underneath and the four fingers over the top.
.jpg) The thumb should be positioned opposite the middle finger where the wood and ebony meet. It is common for the thumb of a beginning student to gravitate down onto the curve of ebony between the stick and frog which restricts the flexibility of the thumb. The second finger should touch the silver eyelet. The position of the index finger affects the entire hand position, and when positioned correctly, with the second joint on the stick, the other fingers automatically fall into the correct position. Students tend to move the first finger above or below the second joint, but this pulls the other fingers up too high or pushes them down too low. Young bassists also will try to use a hand position with the pinkie raised off the bow and floating in the air, but this position reduces control because the French bass bow is heavy. The pinkie should be held next to the rest of the fingers for control.
The thumb should be positioned opposite the middle finger where the wood and ebony meet. It is common for the thumb of a beginning student to gravitate down onto the curve of ebony between the stick and frog which restricts the flexibility of the thumb. The second finger should touch the silver eyelet. The position of the index finger affects the entire hand position, and when positioned correctly, with the second joint on the stick, the other fingers automatically fall into the correct position. Students tend to move the first finger above or below the second joint, but this pulls the other fingers up too high or pushes them down too low. Young bassists also will try to use a hand position with the pinkie raised off the bow and floating in the air, but this position reduces control because the French bass bow is heavy. The pinkie should be held next to the rest of the fingers for control.
With either style of bow the right elbow should be held away from the body with the forearm pointing left; the arm should not be vertical with the elbow pointing at the floor. The weight of the arm transfers to the front of the hand and that is what applies weight to the upper part of the bow. Remember that the fingers will not be at the correct angle if the elbow is not held out.
Left Hand Position
When the left hand is placed on the fingerboard, the forearm should extend straight out from the wrist and instrument. Beginning students often bring the forearm in close to the body and lock the wrist. Others will rest the elbow on the body of the bass and position the forearm parallel to the fingerboard, which decreases finger mobility. From the elbow to the middle finger should be a straight line. Instead of letting the thumb and fingers of the left hand collapse, they should be curved as if encircling a can. Some students use only the tips of their fingers on the fingerboard, while others use the pads.
The choice is simply a matter of comfort. Students often flatten or collapse the thumb on the back of the fingerboard, but this restricts mobility. Another common mistake is to grab the bass with the palm of the hand, which prevents the thumb from following the fingers up and down the instrument. The thumb should follow the fingers to provide good pressure against the strings. When the index finger is down, the thumb should be opposite it; when the second and third fingers are down, the thumb should be placed between them. The third finger simply adds support in low note positions, so beginners will only use 1, 2, and 4 on the fingerboard. Because the third finger is not used, there should be space between the first and second fingers to stop the strings in the correct place.
Students who hold the first finger too close to the second can usually correct the problem by simply pointing the index finger up. All four fingers should be perpendicular to the strings and remain close to the fingerboard. There is a tendency for beginners to raise the fingers two or three inches above the fingerboard when not pushing on a string; but the further the fingers move away, the longer it takes for them to move back for the next note.
The Bow and Sound Production
A bass produces the best sound when the bow is just above the center of the area between the bridge and the fingerboard. The bow should be tilted slightly up toward the fingerboard to spread the hairs of the bow. More hair in contact with strings produces more sound, but beginners often play with the bow perpendicular to the strings.
Rather than only moving the bow to jump from string to string, the bass should rotate a bit. When the bow is on the G string, the bass should be turned into the body. As the bow moves to lower strings, the instrument should be turned away from the player. On the G string, the bow should be just above the center between the bridge and fingerboard. On the lower strings the bow should be closer to the fingerboard because the thicker lower strings will not respond well if played too close to the bridge.
Because it takes a great deal of coordination to draw a full bow, students should start by using only the middle third of the bow. It may help to divide the bow in thirds with pieces of tape. At first students should practice slow and smooth legato bow changes, using the center third of the bow and continue by playing with each third of the bow separately. Once students can control each section of the bow, they can begin using the full bow.
A fundamental of playing any string instrument is to draw the bow straight across the strings, parallel to the bottom of the fingerboard. As a player looks down at the instrument the natural tendency is to tilt the bow. For the beginning lessons the teacher should physically guide a student’s forearm and wrist. Place your left hand on a student’s shoulder and then grasp his right wrist with two fingers on top and the thumb below to guide the arm and hand. Students often lock the wrist and elbow, but each joint should be relaxed and move fluidly. The movement of the bow arm comes from the back of the shoulder. It often helps to compare parts of the body to parts of a car: the upper arm, shoulder, and back muscles act as an engine to provide power while the lower arm is a shock absorber.
Many students approach bowing without a proper concept of the motion or pressure needed to produce good tone. Directors should alternately grab the tip and nut (frog) of a student’s bow as he plays to create resistance, which will in turn cause the student to draw the bow slowly and apply sufficient pressure in both the up and down bow. On a down bow, the muscles from the back of the shoulder are used, and on an up bow, the chest muscles are used. In both directions the bow hair should sink into the strings, not skate on top of them. Poor intonation is common with beginners be-cause low pitches are difficult to hear and tune. Once students develop good bowing technique, the next step is ear-training exercises to identify pitch problems. Directors should select orchestra music with interesting bass parts that will encourage bass students to practice and progress.
Instrument Setup
.jpg) String basses are among the most neglected of instruments in a public school because they are awkward to transport and expensive to repair. Students typically do not own these instruments and treat them carelessly. For a student to develop good playing habits the bass has to be in good condition. The bridge causes the most problems. If set too low it rattles and buzzes the sound. Adjustable bridges alter the height of the strings with a few twists of adjustment screws, and this flexibility is worth the extra cost. A warped bridge will cause the bow to hit two strings simultaneously. If the notches on a bridge wear down, one solution is to raise an adjustable bridge, but another is to place a small piece of cloth or felt between the strings and the notches.
String basses are among the most neglected of instruments in a public school because they are awkward to transport and expensive to repair. Students typically do not own these instruments and treat them carelessly. For a student to develop good playing habits the bass has to be in good condition. The bridge causes the most problems. If set too low it rattles and buzzes the sound. Adjustable bridges alter the height of the strings with a few twists of adjustment screws, and this flexibility is worth the extra cost. A warped bridge will cause the bow to hit two strings simultaneously. If the notches on a bridge wear down, one solution is to raise an adjustable bridge, but another is to place a small piece of cloth or felt between the strings and the notches.
Do not store basses near a radiator or an outside wall because erratic temperature changes will damage the instruments. A bass resting against a cold wall in winter may crack or come unglued. An area with a controlled temperature minimizes these problems.
Because a set of bass strings can be costly, directors defer replacing them, but all strings unravel with time and distort the sound. A set of good strings can be purchased for about $150.
Only a bow with a full complement of clean hair and sufficient rosin will grab the strings properly. The bow hair should be taut while playing and slightly loosened when not in use. Students will naturally grab the bow with the palm wrapped around the hair to check for tautness, but grease from hand perspiration causes the bow to slip on the strings.
A good way to check hair tension is with the index and middle fingers acting like scissors. Because every bow screw is different, directors should spend a minute with each student to determine how many times the screw should be loosened and tightened. Student have a tendency to overtighten the bow, which bends the bow out from the hair.
Rosin helps the bow to grip the strings of the bass. With too little rosin the bow will slip, but too much rosin makes it difficult to draw the bow smoothly across the strings and a coating will build up on the strings and distort the sound. Beginners usually start with a fresh cake of rosin, which is hard and flat. Scrape the cake with a key to rough it up before applying rosin to a bow. Then hold the rosin in the left hand and pull the bow across the rosin in one direction. The bow can be moved across the rosin in both directions, but students tend to rosin only the middle section of the hair with this method. By pulling the bow in one direction across the cake, the odds are better that rosin will be spread evenly. Five strokes will usually suffice, but new hair may take eight or nine strokes.
Even beginning students should develop the habit of keeping a soft cloth nearby to wipe away the rosin dust that builds up on strings and on the instrument during each session. They should also wipe off the fingerboard because perspiration from the left hand will ruin the strings if left to dry.
Small students and large instruments are not often considered a good combination, but if directors help young bassists to avoid the most common errors of beginners, they will develop the technical foundation to become the next Bottesini or Dragonetti.


