How beginning students feel during and after a first recital experience will have a direct effect on how they perform in future concerts. Unfortunately many teachers do not prepare novice flutists for a recital as well as they would prepare university students. Considering how important performing is in a life in music, the results of careful preparation and guidance at this earlier time will pay off exponentially in the future.
Start Early and Be Consistent
Some teachers follow the philosophy of learn the notes first and then we will put the in musicality later. This method is not nearly as successful as teaching musicianship from the very first lessons. Good habits should be taught and practiced over and over again at every lesson so when a student walks on stage, playing well musically is an established routine.
Look like a Flutist
In Suzuki training students are taught where to place their feet in the first lesson. Then in subsequent lessons they are reminded over and over again what to do until it becomes a habit. Just mentioning what the stance should be is not enough. The old adage “You haven’t taught until they have learned” is a good one to heed. Teaching stance like many other things should be drilled and drilled.
One of my favorite flute items is a ceramic tile of a young boy playing the flute. Even though he is playing left-handed, he has the correct stance. It seems to me that if a visual artist knows how a flutist should stand, every flutist should know this too.
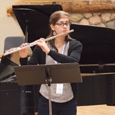
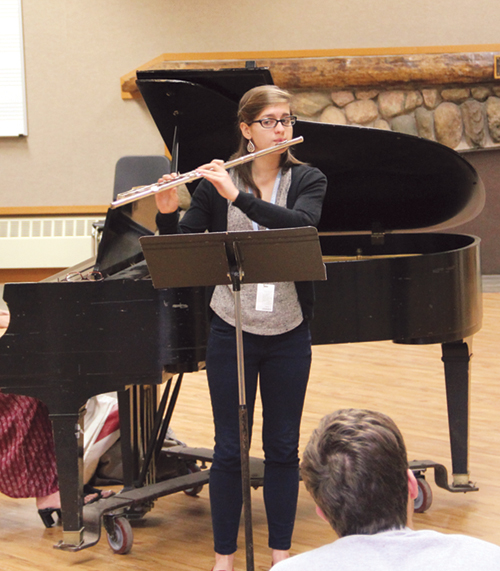
Every time young flutists play, they should be checked for correct stance and posture. Take a photo with a smart phone at the lesson to give students a quick visual image of what they should look like when playing.
Once young flutists learn to play well on the headjoint, they should play on the headjoint and body with the right hand on the barrel for several months. Align the headjoint and the body for them and mark several lines around the flute with a permanent marker or fingernail polish, so they can align the flute correctly at each practice session. Each week be diligent in checking that the marks are still there and that the student has used the marks as a guide in assembling the flute. I have seen many young students come on stage and play with a poor tone because no one has aligned their flutes properly. I continue to check this alignment for many years until the flutist is secure in positioning the headjoint. One of the secrets of a beautiful sound is playing on a flute that is correctly aligned.
Stage Presence
Have students practice walking on the stage, bowing, adjusting the music stand (height and in relationship to the piano), placing music on the stand, performing (this could be a pretend performance), being still at the end of the presentation, bowing with the accompanist, removing the music and walking off stage. In judging we have all seen students play too far away from the piano, too close to the music stand, or with the stand positioned too high. Flutists should stand approximately 30 inches away from the music stand, and the top of the stand should be no higher than a flutist’s chin.
Sound like a Flutist
Sound is the first thing an audience perceives. All flutists have some fluctuation in sound production from one day to the next. A professional knows what to do immediately to turn a not-so-good sound day into one that is terrific.
Professionals check stance, how the flute is balanced in the hands, how separated the vocal folds are, if the jaw is dropped enough, the size of the oral cavity, and the placement of the tongue. These items prepare the way for the air stream. There are three things to consider about the air stream: size, speed and angle. If there are sound problems, one of these things is out of sync.
Generally younger players should be reminded to blow at each lesson. When young flutists are nervous, the first thing to falter is the air stream. Remind students to immediately consider the size and the speed of the air stream. Remembering to blow (play on the exhale) will calm the butterflies quickly. The next step is to assess the angle of the air as it hits the embouchure hole wall. If the tone is airy and lacks core, then the flutist should angle the air towards the left big toe. Of course for this to work, the flutist must be in a proper stance.
The Right Number of Beats in the Bar
When quizzed, most young performers can tell you how to count each bar of music in their solo. What they have problems with is playing these rhythms with a regular pulse. One practice suggestion is to have students play through the solo chunked by bars. This means to play one bar and then rest one pulse on the bar line. Repeat this chunking exercise throughout the composition. Resting on the barline helps students define what music is actually in each measure. During the silence of the rest, student have time to reorganize their thinking and playing. Saying aloud the name of the next note, blow, or set in the rest or silence will help organize students’ playing.
The next time through the solo, the teacher and student alternate playing by one bar each or one phrase each, back and forth in a ping-pong style. On the first pass of this exercise the teacher plays the first bar or phrase and then on the next pass, the student begins. This exercise helps develop flow.
Sometimes students lack an awareness of how they deviate from tempo or playing the correct number of beats in a measure. A smartphone or tablet’s recording device can be used effectively. First click off the tempo with the metronome for a point of reference. Then record the student playing through the solo without the metronome. On the playback turn the metronome on with the recorded performance so that the student can hear where the clicks on the metronome do or do not align with the performance. (This exercise is equally effective using a tuner as the student can see from the tuner’s gauges where and what the pitch tendencies are.)
Since flutists are unable to count aloud, using the voice setting on a metronome gives students an aural reminder of what count they are on. Most professionals I know use this voice setting during a major portion of their daily practice, especially on scales, arpeggios, scales in thirds and sixths, and seventh chords. The thought is that more stimuli going on at once increases the level of awareness.
Floaters
A floater is a note that floats in between two written notes and is produced by poor fingering skills. When listening to the recording that was made in the previous exercise, mark in the music all the places where the intervals were not played clearly. On a separate piece of manuscript paper, write down these problem places and then practice moving the fingers until the intervals are cleanly executed. For example when going from D to G in the second octave, the right three fingers must lift at the same time. Flutists have a tendency to let these notes peal or ripple off rather than having the right three fingers move as a unit. Practicing these intervals as if they were two trilled notes improves coordination.
Musical Elements
On the most basic level, music of the Baroque, Classic, and Romantic periods is composed of scales, arpeggios, scales in thirds and sixths, and seventh chords. The flute and piano compositions young flutists study as well as the etudes that advanced students and professionals practice follow this scheme. Having excellent control of these theoretical techniques makes playing the flute and flute music easier.
Besides these theoretical techniques, there are several melodic patterns that have been used by most composers for over 200 years. These patterns are found over and over again in compositions and in some cases have been given specific names all of which are listed under the heading of musical gestures. Teaching young students how to interpret these gestures early in their musical studies, will help build a foundation for future musical growth as they will understand the musical logic and meaning of these gestures.
The Sigh

The sigh figure is two slurred notes, generally descending, in which the performer puts more weight or stress on the first of the two notes. This gesture was first used in the Renaissance when composers employed text painting as a compositional device. In madrigal writing these two notes were set with the words kiss-ing, dy-ing, lov-ing etc. The length of the first note is usually the same as the second; however, the first note can be of longer written length value. Practicing descending scales slurring by twos is an efficient way to practice this gesture. Students will continually have to be reminded to exaggerate the dynamics by playing the second note softer than the first.
Rockets
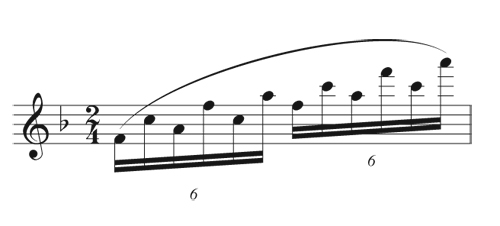
Broken chords (triads or seventh chords) that ascend up the range were named Mannheim Raketen (rockets, imitating Roman candles as in fireworks.) These are performed with the natural crescendo that occurs when ascending up the flute. Practicing ascending triads in inversion (root, 1st and 2nd inversion) plus broken triads and seventh chords on a regular basis makes these easy to perform when they appear in the literature.
Papageno
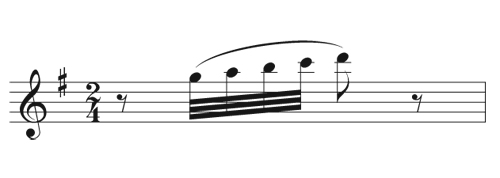
Many composers were keyboard composers. The 5-note scale is a natural, idiomatic gesture derived from using the thumb and four fingers to ascend one note after another. Or, the 5-notes may descend from the little finger. As pianists’ say, “It is in the hand.” On the flute of course each note requires a different fingering so it may not be so much in the hand. The most famous use of this is in Mozart’s opera The Magic Flute in Papageno’s aria where he calls his true love Papagena on his magic flute.
Of course there are many gestures that are used over and over again in the literature, but having a good grasp of these three will serve students well. Naming them (sigh, rocket, Papageno) offers a quick shorthand that you can say when students are playing to get them to play with more expression.
Through the years I have heard student teachers say that they don’t enjoy teaching beginning students. This brings two thoughts to my mind: one, they don’t know how to teach beginners, and two, it is always easier to teach what you yourself have studied in your last lesson than to teach someone what they need to know. Teaching musicianship from the beginning is always the best option.


